Showing posts with label Blog Design. Show all posts

Thursday, November 28, 2013

[Blog Design] How To Edit Twitters Design On My Blog?


 For a few months ago, there were many pro bloggers that have a twitter feed like this on top of their blog and I think it was really nice that I wanted to make one too. 

But then twitter suddenly changed the codes and most pro bloggers removed it, because their designer created it for them and once the codes changed, they did not know how to fix it.


Personally I don't like the original box from twitter
Removing the frame give you a chance to re-design it


You can find this under settings

Click Widget!



If you don't already have one, you can create a new widget
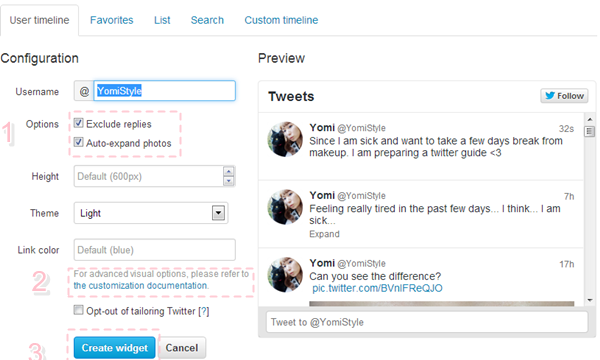


1. Exclude Replies
That mean it won't show up your twitter feed if when you reply to other twitters. I would tick that option, because I only want to show what I want to share, not when I am like chatting with other twitters.

Auto-expand photos
I would tick this one off, because it will show the whole photo on your twitter feed once you post a photo on your twitter. I don't want something that will take so much space.

2. Advanced Editing
The options from above is only the most basics, if you want to edit it more advanced like removing the frame and other things. Then you will need to learn some simple code, they will show it to you if you click that link.


The code and twitter feed I get from basic options


The Code and twitter feed after advanced editing


Tweets by @YomiStyle


Don't you like this one more?


How To Make It?

I added these code to remove everything around it!

data-chrome="nofooter transparent

noscrollbar

noborders 

noheader"


after the first sentence:

<a class="twitter-timeline" 


Add width and limit tweets:


"width 350"  data-tweet-limit="1" 


Just put it after these codes I mentioned from above.

You can change the width and how many tweets you want to be shown.


I hope that I did not make it too complicated 
and it's useful for you!

Let me know if you have any questions.

Follow Me  : Facebook / Twitter / Bloglovin / GFC

Sunday, October 6, 2013

[Blog Design] How To Add Backround Image Under Tabs?


What is tabs background image?

You can see that on my blog design, it's the picture under my tab text. The whole pink background is actually a image I have putted under the tab text!


Click The Following Buttons:

1. Template

2. Customize

3. Advanced

4. Add Css

If it's your first time to edit Css
I have another tutorial that are more detailed with pictures: 


Copy this code and past it to your Css box:

        .tabs-inner .section:first-child ul {border:0}
.tabs-inner {
background-image:url(     IMAGE URL    );
background-repeat:no-repeat;
position:relative;
left:30px;
height:80px;
padding-right:px;
}


I did not include my image for you, because I don't want everyone to have the exact design as mine and I don't think you would want that either. So you need to find your own and put the image url instead of the           yellow text.


How To Move It?

It's more likely to don't match your blog so well with the code I am showing you now, so you will need to edit the codes a little on the CSS box while watching your page under it.

left:30px;
height:80px;

Change the number of these code to move the background image around. 


How did I find my image?

The ribbon image is from some Photoshop brushes that are original black and white, but I changed the colors and found a size that suits my blog. So if you use Photoshop too, then maybe you could look around for some great brushes too.


I hope this helped you and you are always welcome to ask me if you have any questions. 

Let me know if you use it! I want to see how you created your own tabs background!


Follow Me  : Facebook / Twitter / Bloglovin / GFC

Saturday, September 28, 2013

[Blog Design] How To Remove Header Widget and Make a Header With Multiple Buttons


Since I won't make beauty post for a few days and still want to update my blog for you guys. I have decided to share some fun codes to you! 


What do you mean about header with multiple buttons?

I created the picture from above randomly to make a example for you guys. It's suppose to be a header and you will be able to click all of these text that will lead you to different links you have chosen!


What about remove the header widget?

Because you will need to use a HTML box instead of the original header widget, so we need to remove the original one or else it will force you to type something in for the title and will show above the new banner we created! I will explain more later!


Sample : Click Here
I used it on a new testing blog, so you can take a look and try clicking these buttons!


Sunday, September 22, 2013

[Blog Design] Basic Coding: How To Center Tabs Text and Gadget Titles


Since I have heard many of my readers don't know much about coding or just not tried much around it. So I will start with the easiest and most basics that I think will be useful for many of you.

I will make a coding post once in a while from now on
So if there is any specific codes you want me to make a post about, you are welcome to tell me about it on my comment box and I will consider over making a post for it on the coming week.

Maybe some of you don't know, but it take less than 3 minutes to make them into the center.


I have seen many blog that have their gadget titles and tabs on the left side instead of in the center, but personally I think it would looks better to make them into the center.


Before 

After

Here is a example of how my blog would looks like if I did the centering codes or not.

Don't you agree that the after one looks better? So if you still have not done it yet, then maybe you should consider about using this code on your blog!

So.... After all this talk... How to do it?


On the page where you edit everything for you blog

1. Click Template

2. Click Customize


After these steps above you will be directed to a page that can do easy editing for your blogs design.

1. Click Advanced

2. Scroll down and Click Add CSS

3. Copy the code from below and past it to the CSS box

Center Tabs Text


Center Widget Titles
DONE!

I hope some of you find this to be useful!

If you used it, let me know how it worked for you!


Follow Me  : Facebook / Twitter / Bloglovin / GFC
Related Posts Plugin for WordPress, Blogger...

ShareThis